
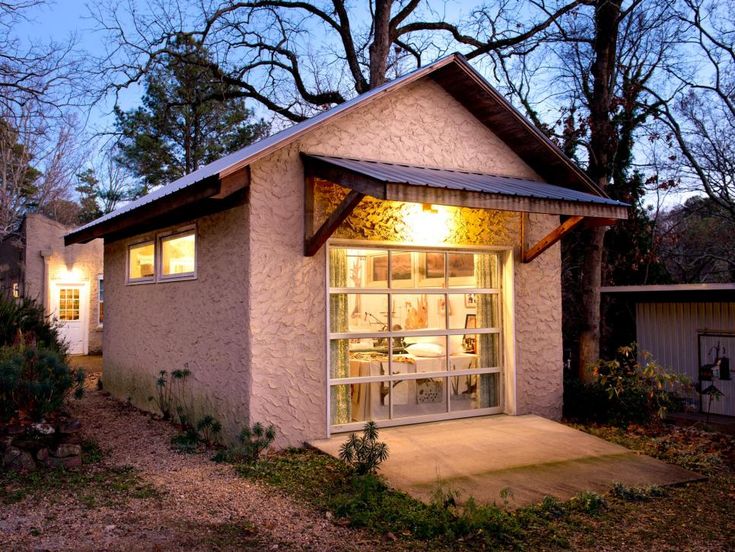
Are you a Bay Area homeowner considering the addition of a detached garage to your property? This expansion can be a game-changer for your home’s functionality and value. However, constructing a detached garage in the Bay Area comes with its own set of challenges and requirements. Here’s a step-by-step guide to navigating the process smoothly.
Understanding the Bay Area's Unique Building Environment
The Bay Area is known for its strict building codes, seismic safety requirements, and environmental regulations. Before diving into constructing a detached garage, it’s essential to familiarize yourself with these aspects to ensure a successful project.
Step 1: Research and Planning (Weeks 1-4)
Zoning and Permits
Start by understanding local zoning laws, which vary within the Bay Area. Some zones may restrict the height, footprint, or even the style of a detached garage. Visit your local planning department to get the necessary permits. This step can take anywhere from a few days to several weeks, depending on the complexity of your project.
Design Considerations
In the Bay Area, design isn’t just about aesthetics; it’s about resilience. Your garage design must meet seismic codes. Hiring an architect or a designer who specializes in the region is crucial. They can help you navigate local requirements and create a functional and compliant structure.
Budgeting
The cost of building in the Bay Area is typically higher than the national average due to labor costs, the price of materials, and permit fees. Create a detailed budget, including at least 15-20% buffer for unforeseen expenses.
Step 2: Hiring the Right Team (Weeks 5-8)
Choosing a Contractor
Selecting the right contractor is one of your most critical decisions. Look for licensed professionals with experience building detached garages in the Bay Area. They should be familiar with local building codes and the permit process. Check their references and past projects before signing a contract.
Finalizing Your Design
Work with your chosen contractor and architect to finalize the garage design. This may involve several iterations to ensure the plans are perfectly tailored to your needs and the regulations of the Bay Area.
Step 3: Site Preparation (Weeks 9-12)
Clearing and Excavation
Your contractor will prepare the site, which includes clearing vegetation, removing debris, and excavating the area for the foundation. Special attention must be paid to the soil type in the Bay Area, as some sites may require more extensive groundwork due to seismic activity risks.
Foundation Work
The foundation of your detached garage is crucial, especially in an earthquake-prone area. Options such as slab-on-grade foundations are standard in the Bay Area. Still, your contractor may recommend a different type based on the location and soil conditions.
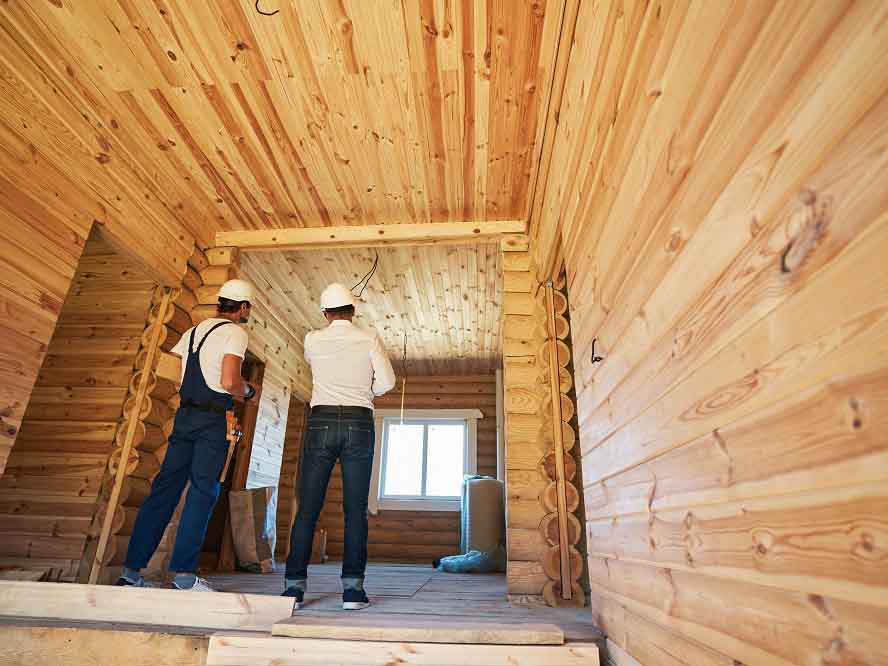
Step 4: Construction Phase (Weeks 13-26)
Laying the Foundation
Expect this phase to take several weeks, as the foundation must be cured and inspected before proceeding. This is also when any underground utilities should be installed.
Framing and Exterior Work
Framing will outline the shape of your garage. In the Bay Area, framing materials and methods must adhere to strict seismic codes. Once the frame is up, exterior work like siding and roofing can begin.
Interior Work and Insulation
Interior work includes installing walls, windows, doors, and any necessary insulation. Energy efficiency is a priority in the Bay Area, so high-quality insulation is a wise investment.
Utilities and Finishing Touches
If your garage requires electricity, plumbing, or internet connectivity, these systems will be installed next. After utilities are in place, interior and exterior finishes can be applied.
Step 5: Final Inspections and Finishing Details (Weeks 27-30)
Inspections
All construction in the Bay Area is subject to inspection. Expect multiple inspections throughout building, with a final inspection upon completion.
Driveway and Landscaping
With your garage almost ready for use, the driveway and any surrounding landscaping can be completed. Be mindful of local water conservation requirements when choosing plants and materials for your outdoor space.
Final Walk-Through
Conduct a final walk-through with your contractor to ensure everything meets your expectations and adheres to the agreed-upon design and specifications.
Common Challenges and How to Overcome Them

Building a detached garage comes with a unique set of challenges. Still, they can be successfully overcome with careful planning and consideration. Here are some common challenges and ways to address them:
- Zoning and Building Codes: Check local zoning laws and building codes before beginning. These can dictate the size, placement, and materials you can use for your garage. Overcome this by consulting with your local planning department to ensure compliance.
- Matching the House Style: A detached garage should ideally complement your home’s architectural style. This can be challenging, especially for older homes. To overcome this, hire an architect or designer familiar with your home’s era and style to ensure a cohesive look.
- Budgeting: Cost overruns are common in construction projects. To mitigate this, get detailed quotes from contractors and budget for unexpected expenses. A contingency fund of around 10-15% of the total cost can be helpful.
- Driveway and Access: Ensuring easy access to the garage can be tricky, especially on smaller or irregularly shaped lots. Work with a landscape architect or designer to create a functional driveway plan that maximizes your space.
- Utilities and Wiring: Running electricity, and possibly plumbing, to a detached garage can be complex. Hiring a licensed electrician and plumber to ensure everything is up to code is essential.
- Insulation and Ventilation: Proper insulation and ventilation are essential if you plan to use the garage as a workshop or for storage. Consult with professionals to choose the right materials and techniques for your climate and garage’s use.
- Security: A detached garage can be more susceptible to break-ins. Invest in good quality doors, locks, and consider a security system or motion sensor lighting.
- Permits and Inspections: Obtaining the necessary permits and passing inspections can be time-consuming. Stay ahead of this by applying for permits early and scheduling inspections in advance.
- Weather Considerations: In areas with extreme weather, your garage must withstand heavy snow, wind, or flooding. Consult a structural engineer to ensure your garage is built to withstand local weather conditions.
- Contractor Reliability: Hiring reliable and skilled contractors is crucial. Get references, read reviews, and check their previous work to ensure they are reputable and can deliver quality work.
By addressing these challenges head-on, you can ensure that your detached garage project is successful and adds value to your property.
Maintaining Your Detached Garage in the Bay Area

Once your garage is built, regular maintenance is essential. In the Bay Area, check for any structural issues, particularly after an earthquake, and keep an eye on waterproofing and insulation integrity to handle the damp coastal climate.
Maintaining a detached garage in the Bay Area requires special attention due to the region’s unique climate and environmental factors. Here are some essential maintenance tips:
- Regular Inspections: Periodically inspect your garage for any signs of damage or wear, particularly after extreme weather events. Look for cracks in the foundation, roof damage, or issues with the garage door.
- Moisture Control: The Bay Area’s damp climate can lead to moisture problems. Ensure good ventilation in your garage to prevent mold and mildew. Installing a dehumidifier can also help in keeping the interior dry.
- Pest Control: The area is prone to pests like rodents and insects. Seal any cracks or openings and consider regular pest control treatments to keep them at bay.
- Roof Maintenance: Regularly clean the roof and gutters to prevent water damage and leaks. Inspect the roof for any wear or damage, especially after heavy rains or strong winds.
- Paint and Exterior Care: The salty air can affect exterior paint, especially if you are closer to the coast. Use high-quality, weather-resistant paint and perform touch-ups to protect the exterior from the elements.
- Earthquake Preparedness: Since the Bay Area is earthquake-prone, ensure your garage is structurally sound. Consider retrofitting if it’s an older structure, and keep heavy items securely stored to prevent damage during a quake.
- Door Maintenance: Regularly lubricate the garage door springs, hinges, and rollers for smooth operation. Check the door balance and alignment, and ensure the auto-reverse feature (if equipped) is working correctly.
- Flooring Care: Clean the garage floor regularly to remove oil, grease, and other stains. Consider sealing or epoxy-coating the floor for extra protection and easier maintenance.
- Security: Regularly check and maintain any security systems, locks, or lighting to ensure your garage remains secure.
- Climate Control: If you use the garage as a workspace or for storing temperature-sensitive items, consider installing heating or cooling solutions to maintain a stable environment.
By following these maintenance tips, you can keep your detached garage in the Bay Area in good condition, protecting your investment and ensuring it remains a functional and valuable part of your property.
Maximizing Garage Utility
Think about the long-term use of your garage. With the growing popularity of electric vehicles, consider pre-wiring for EV charging stations. Also, as more people work remotely, you might want to design the space as a potential home office or flex space.
Maximizing the utility of your garage involves careful organization and thoughtful upgrades. Here are some strategies to get the most out of this space:
- Efficient Storage Solutions: Install shelving, cabinets, or overhead storage systems to organize tools, seasonal items, and other garage essentials. Pegboards or wall-mounted panels can be great for hanging tools, sports equipment, and gardening supplies.
- Workbench Area: If you enjoy DIY projects or need a workspace, set up a sturdy workbench. Include good lighting and easy access to power outlets. If space is limited, consider a fold-down workbench.
- Flooring Upgrade: Upgrade the flooring for durability and ease of cleaning. Epoxy floor coatings are popular for garages as they are resistant to stains and spills and easy to clean.
- Lighting Improvements: Good lighting is crucial in a garage. Install bright, energy-efficient LED lights. Consider task lighting over workbenches and brighter overhead lights for general visibility.
- Vertical Space Utilization: Don’t forget the vertical space. High shelves or ceiling-mounted storage racks can store items you don’t use frequently, such as seasonal decorations or camping gear.
- Multipurpose Use: Consider if you want the garage to serve multiple purposes, like a gym, workshop, or hobby area. Plan the layout to accommodate these activities without cluttering the space.
- Insulation and Climate Control: If you spend much time in your garage or store temperature-sensitive items, consider insulating the walls and door. Installing a heating or cooling unit can make the space comfortable year-round.
- Security Upgrades: Ensure your garage is secure to protect your belongings. This might include sturdy locks, security cameras, or motion-sensor lights.
- Parking Space Optimization: If you park vehicles in the garage, ensure enough room to do so comfortably. Consider adding parking aids like wall bumpers or floor markings to assist with tight spaces.
- Regular Maintenance: Keep the garage clean and well-maintained. Regularly declutter and reorganize to ensure the space remains functional and efficient.
Focusing on these areas allows you to transform your garage into a highly functional space that meets your storage and activity needs.
Sustainability and Green Building

Consider green building practices for your garage in line with California’s environmental initiatives. This could include installing solar panels, utilizing sustainable materials, and ensuring the garage is well-insulated and energy-efficient.
Solar Panels
The sunny climate of the Bay Area is ideal for solar panels. While the upfront cost can be significant, solar energy can reduce your long-term energy bills and your carbon footprint. Moreover, California offers various incentives for solar installations, which can help offset initial costs.
Rainwater Harvesting
Another environmentally friendly practice is rainwater harvesting. Collecting rainwater can be a great way to maintain your landscaping, especially considering the region’s water usage restrictions.
Green Roofing
A green roof can help manage stormwater, reduce heat, and improve air quality. It’s a beautiful and practical addition that can also extend the life of your roof.
Conclusion
Starting a project to build a separate Bay Area garage is exciting and challenging. It needs careful planning and an attention to detail. Homeowners can steer their projects to success if they know what to do at each step and how to deal with the unique problems in their area.
Working with professionals with much experience, staying current on local building rules, and keeping a close eye on your budget are essential. This will ensure that your garage meets your wants and increases the value of your home over time. A separate garage isn’t just a place to park your car; it’s an extension of your home. When done right, it’s a valuable tool that makes your home more worthwhile, more convenient, and more beneficial overall.
Rhino Garage Conversion Bay Area can help you make your new separate garage a standout part of your Bay Area home.